Contact Form 7 comes installed with your website. It is a simple but powerful form creator for WordPress. In this post you’ll learn how to use Contact Form 7 to create and edit a basic form.
The basics of the plugin
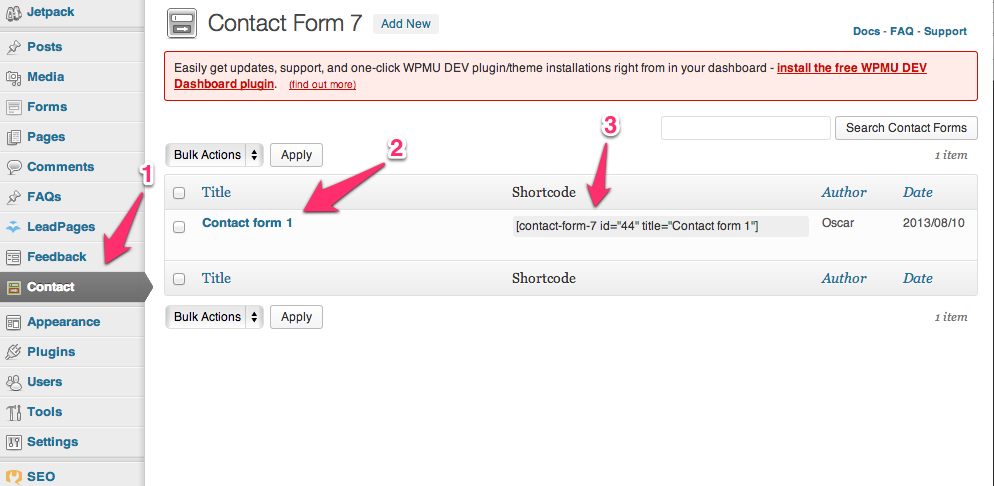
- After Contact Form 7 is installed, you’ll find a new menu item in your WordPress Dashboard. It is called Contact .
- From the Contact main screen, you will see your first contact form. It comes pre-made for you. Usually called “Contact form 1”
- This screen also shows you the shortcode you’ll need to install this form on a post or a page. It’s handy to have that once you get familiar with your forms and start using and creating a lot of them or a few of them.
By clicking on the title of the form, or clicking on the “edit” link that appears when you mouse over it, you can modify the form.
You can create new forms, or edit the one that is there. The form in the edit view looks like this:
Editing and Creating your first form
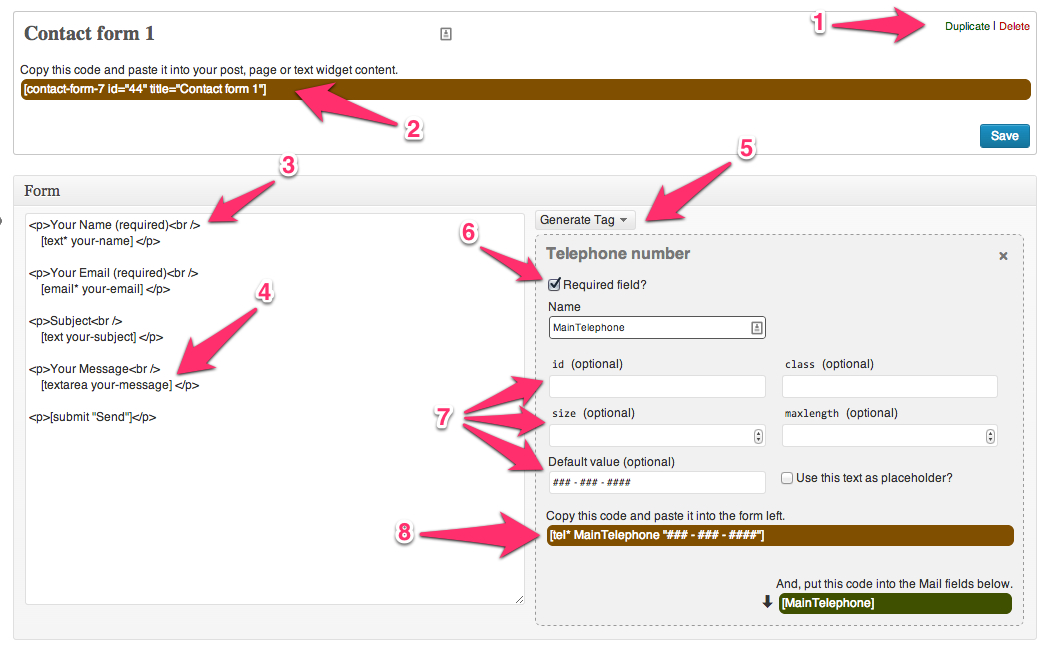
Keep in mind, editing Contact Form 7 requires what we call “shortcodes” in WordPress these shortcodes are words surrounded by square brackets like “[” and “]”. And to give it any style or layout you want, you’ll need to know at least basic HTML and maybe CSS. But the first form that is built there for you is a great example when you’re starting out with contact form 7. Let me break down the following screenshot:
- Duplicate will make a copy of your current form. This is great to do testing without modifying your current form.
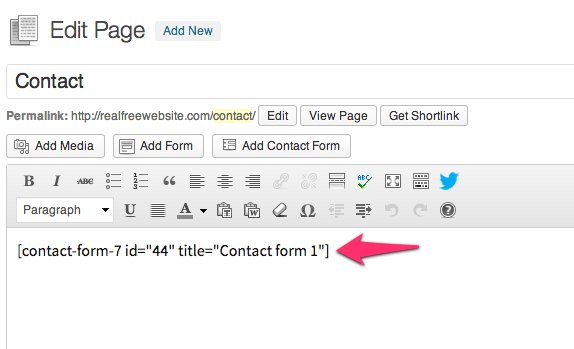
- This is the shortcode that will display the form somewhere on your WordPress website. You’ll copy that code and paste it into a page, then save it. That page will now display your form.
- This is an example of the HTML code I mentioned. It’s basic and you can just follow this template. This code means “line break” the “<p>” and it’s matching pair: <“/p> mean the beginning and end of a paragraph. Very easy and basic HTML.
- This is an example of a builder tag shortcode for Contact Form 7. It means that is goign to show a block text area to be filled out. Like a message in an email.
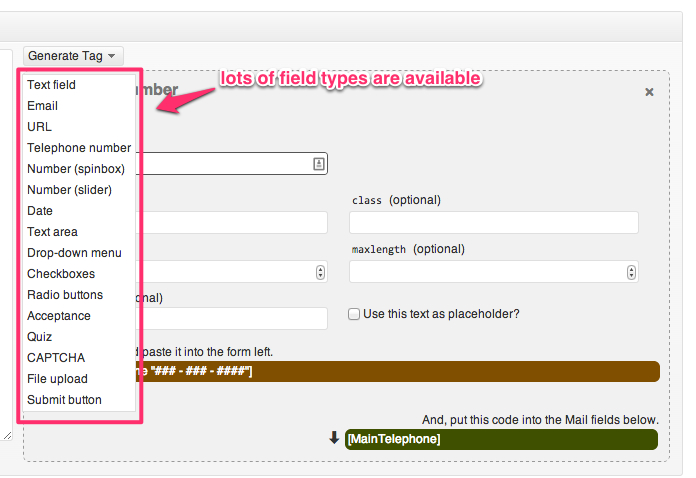
- You use this dropdown menu to select a new form builder tag if you want to add new ones. The rest of the form shown here has a few options filled out to generate a phone number type of field.
- This is how you make a new field a required field. It will add an asterisk “*” to the shortcode for that field. You can see that some of the fields on the left have the asterisk next to their label, like “your-name” and “your-email”. We give this field a name of “Main Telephone”
- These three fields and the ones on the right are for advanced styling options and you’ll use them when you really want to get into modifying and adjusting the styling of your form using CSS, HTML, and maybe Javascript. But you don’t need to use these for basic forms.
- This is the form builder tag that resulted from the options I filled out above it. Then I would have to copy and paste that from that brown box, into the box on the left. Give it a little bit of formatting and that would add a phone number field to my contact form.
Crafting the email message template
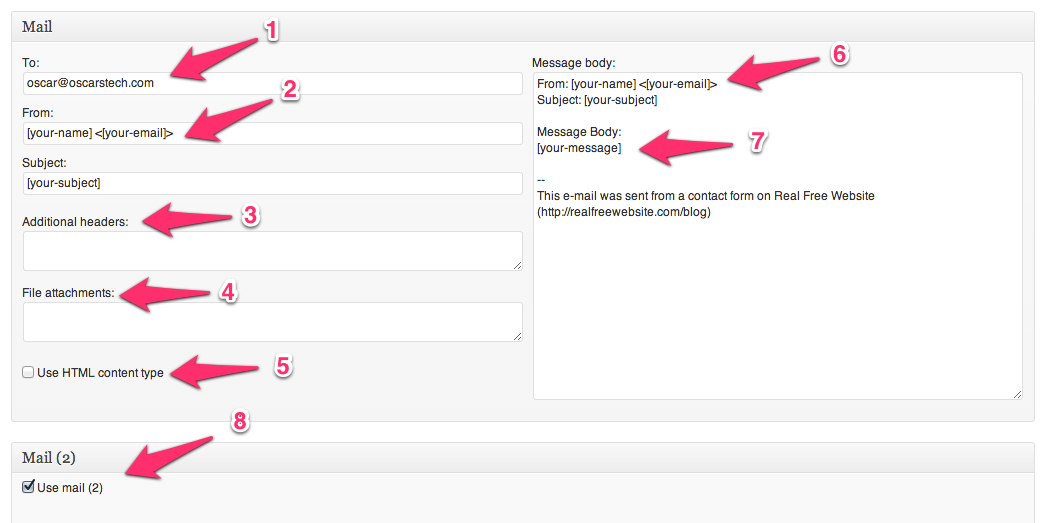
The second and third part of the form editing window let you craft the message that will be sent out. Let’s break that screenshot down:
- The email address this form will go to when it’s filled out and submitted by a visitor
- This is using the “your-name” and “your-email” fields from the form above to create the “from:” address in your email. When someone fills your form out, this will be the address it comes from as well as the name and email of the person that filled it out. Subject is self explanatory, but notice the difference between this section and the one above. There is no HTML code in these fields.
- Additional Headers, you shouldn’t have to change unless a professional tells you so.
- If you wanted to include any kind of attachment, you would do it here. Like if you added an “upload” tag in the previous screen, you could include the attachment file here with its own shortcode.
- Use this if you plan on using an HTML formatted email on the next screen. Usually out of the box, the first form is plain text instead of HTML. But it’s a choice you have.
- The Message body is where you will craft how the message will read when you get it. Notice the stuff in the square brackets “[ ]” match the fields above, the rest of the text will be sent exactly as it appears there.
- You display the information using the same shortcodes we’ve been using all along.
- If you wanted to send a second email at the same time that one form is submitted, you would check this box. Then format the Mail (2) section in similar fashion to the first one. This second mail section is usually for an email that goes to the person submitting their message to you, as a way of giving them a record of their email to you.
Customizing the user experience
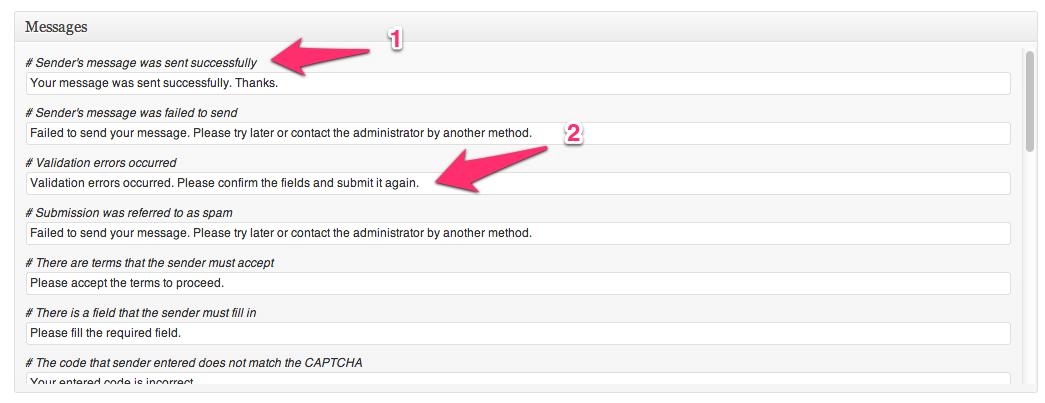
The last section that I want to cover in the editing window is the Messages section. This is where you control the messages that your visitors will see when using your form. There are many different ones, but I’m only pointing two things out in the screenshot below:
- This is the description for each message. Notice that each one below has its own title, the title also describes when this message will show up. This particular example will show up when the message your visitor is trying to send you goes through successfully.
- This is an example of the customization box for each message. Just like their titles, each one has its own text to be customized by you. You can have it say anything you want for when that action takes place, like if the message fails to send, or if the user forgets to fill out a field.
The form in action
The very last part of the tutorial is very simple. Once you have created your form, and you want to use it on a page, on a blogpost or even on a widget on the sidebars or other widget sections on your blog, you simply copy and paste the form’s shortcode (like shown on the first or second screenshot).
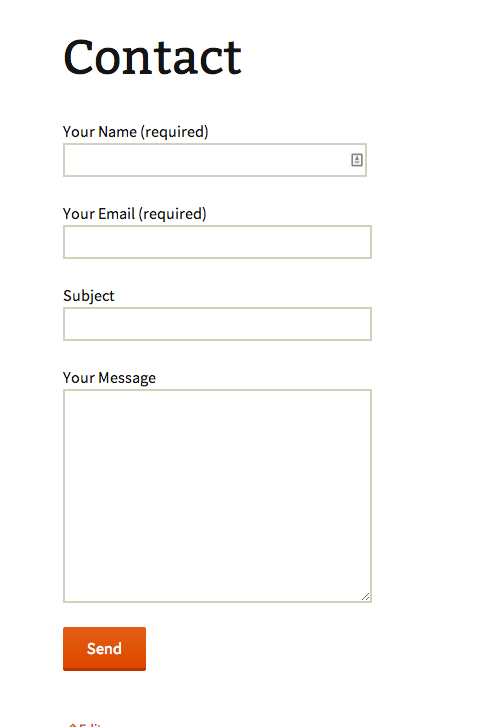
Here’s what it looks like in my contact form page:
You can use forms to get feedback from visitors, you can use them to collect release forms for example, or application forms. You name it, if you want to collect some information from your visitors or the users of your website, then you’ll need some form builder and this is a great choice if you’re on a budget and are willing to get your hands dirty.
The dropdown menu for building form tags has almost every field imaginable and you can customize them to fit any type of form you would use on your WordPress website.
Finally, this is what the basic form looks like to your visitors.


Hi there,
I’m desperately trying to get Mail 2 to work for us. I’ve copied a specific example (with our data) from hecode.com. However, the email back to the message sender (in this case, me doing a test).
If you email me – sunwalker@comcast.net, I will send a screen shot of what I have filled in for Mail 2.